As any good engineer will tell you, better to do it right or not do it at all. But since we live in the real world instead of that sublime state of grace? Sometimes you gotta do a “hack job”.
Sept 2022 – see update at the bottom of this article
Case in point: when RIPR built W275DA 102.9FM last September, that was a sprint to the finish line…with our FCC Construction Permit’s deadline looming and the more-important deadline of our lease ending on WELH 88.1FM.
As the saying goes: “You can have fast, cheap, or quality…pick two.” We needed fast and quality, so it wasn’t going to be cheap. But the budget wasn’t unlimited, either.
For someone known to ramble in his articles, I could write a freakin’ novel on what it took to get W275DA built, but suffice to say we got lucky that Vertical Bridge bought the tower WPRO-FM is on when they did, and also made it available to us at an attractive price, too. But the building associated with it is, ummm, kinda rough.
The Old Days of Neutaconkanut Hill
Built in the 1950’s (maybe older), this building harkens back to the early days of both television and of the nuclear age. When FCC rules (and transmitter technology) required a human be present 24/7/365 to make the necessary constant adjustments to keep the transmitter working correctly, so a full-fledged office, broadcast studio, workshop and transmitter room were all present. There’s even not one but two full apartments (kitchens, bathrooms, living rooms, and bedrooms) for the engineers to live up here for a week at a time.
Since this was early in the nuclear age, it means fears of a nuclear blast required such buildings to be built like tanks: extra-thick concrete-and-brick construction with few windows, and a giant independent power source (e.g. a huge diesel generator). But if you recall, in the 50’s the climate was markedly cooler in Rhode Island. Air conditioning, in general, was an overpriced and unnecessary luxury. So the building has no climate control; just a giant vent fan in the ceiling of the large, open transmitter space.
For many years, this was perfectly sufficient and the building was home to multiple TV station…WPRO-TV ch 12 (now WPRI 12) and WSBE-TV ch 36 (now RIPBS)…as well as the huge “flamethrower” signal of 92.3 WPRO-FM, which covers all of Rhode Island and then some from up here…some 700ft above Narragansett Bay but only three miles from downtown Providence.
Fast-forward seventy years and the building has seen better days. The old apartments are kinda wrecked after a severe roof leak a many years ago (the roof has since been completely replaced and is watertight now, but the damage was done). Until recently, a lot of the rest of the space was used for storage of old equipment (including a few now-useless klystrons for analog TV transmitters). And by “storage” I mean it was more “hoarding”. Worst of all, the air vent system hasn’t had filters for well, probably decades. So while the air vents kept things reasonably cool, they also sucked in a huge amount of dust, pollen and whatnot from the outdoors. Everything in there has a layer of dust and grime on it.
Trying to Keep it Clean
In late 2021, around the same time I was building out W275DA, the guys at Cumulus were replacing WPRO-FM’s old, but perfectly functional, Harris tube-type transmitter (I think it’s an HT25CD) with a new GatesAir solid-state-type transmitter (I think it’s a Flexiva 30 – extra headroom for HD Radio). Solid-state electronics are more susceptible to high heat environments than tubes, so they put up drywall and installed their own split-unit air conditioners.
My original plan was to do more or less the same thing. It would keep my gear cleaner, cooler, and provide a bit more security…not that it’s really a problem now, but if Vertical Bridge gets more tenants it might start to be. So we’d clear out a corner, put up drywall for two walls and a ceiling, add a proper door, some electric outlets, overhead lights/switches, and air conditioning. Unfortunately, the aforementioned good/cheap/quality meant we were already over budget, and inflation meant that an already pricey-looking task suddenly got a LOT more expensive.
Plus with WPRO-FM’s transmitter walled off, the heat load in the room was reduced by 90% or so. It’s a large space, with 15ft high ceilings and good insulation from the thick, stone walls. The vent fan wasn’t running very much, so less dirt coming in from the outside. And it was already fall, with temps dropping…over the winter it got downright chilly inside (40-45F), and the spring was unseasonably chilly, too…so cooling wasn’t an issue. Ultimately, the crying need for our own isolated space just wasn’t squeaky enough to get the grease.
Then in late July 2022 we got a mondo heat wave with ten straight days of 90-95F temps. Suddenly that giant vent fan in the ceiling was running non-stop, sucking in dust, pollen, and lots of already-very-hot-air into the room. Getting W275DA’s equipment into a cooler environment became a priority, but the budget still wasn’t there. What to do?
Getting Clever with Cooling
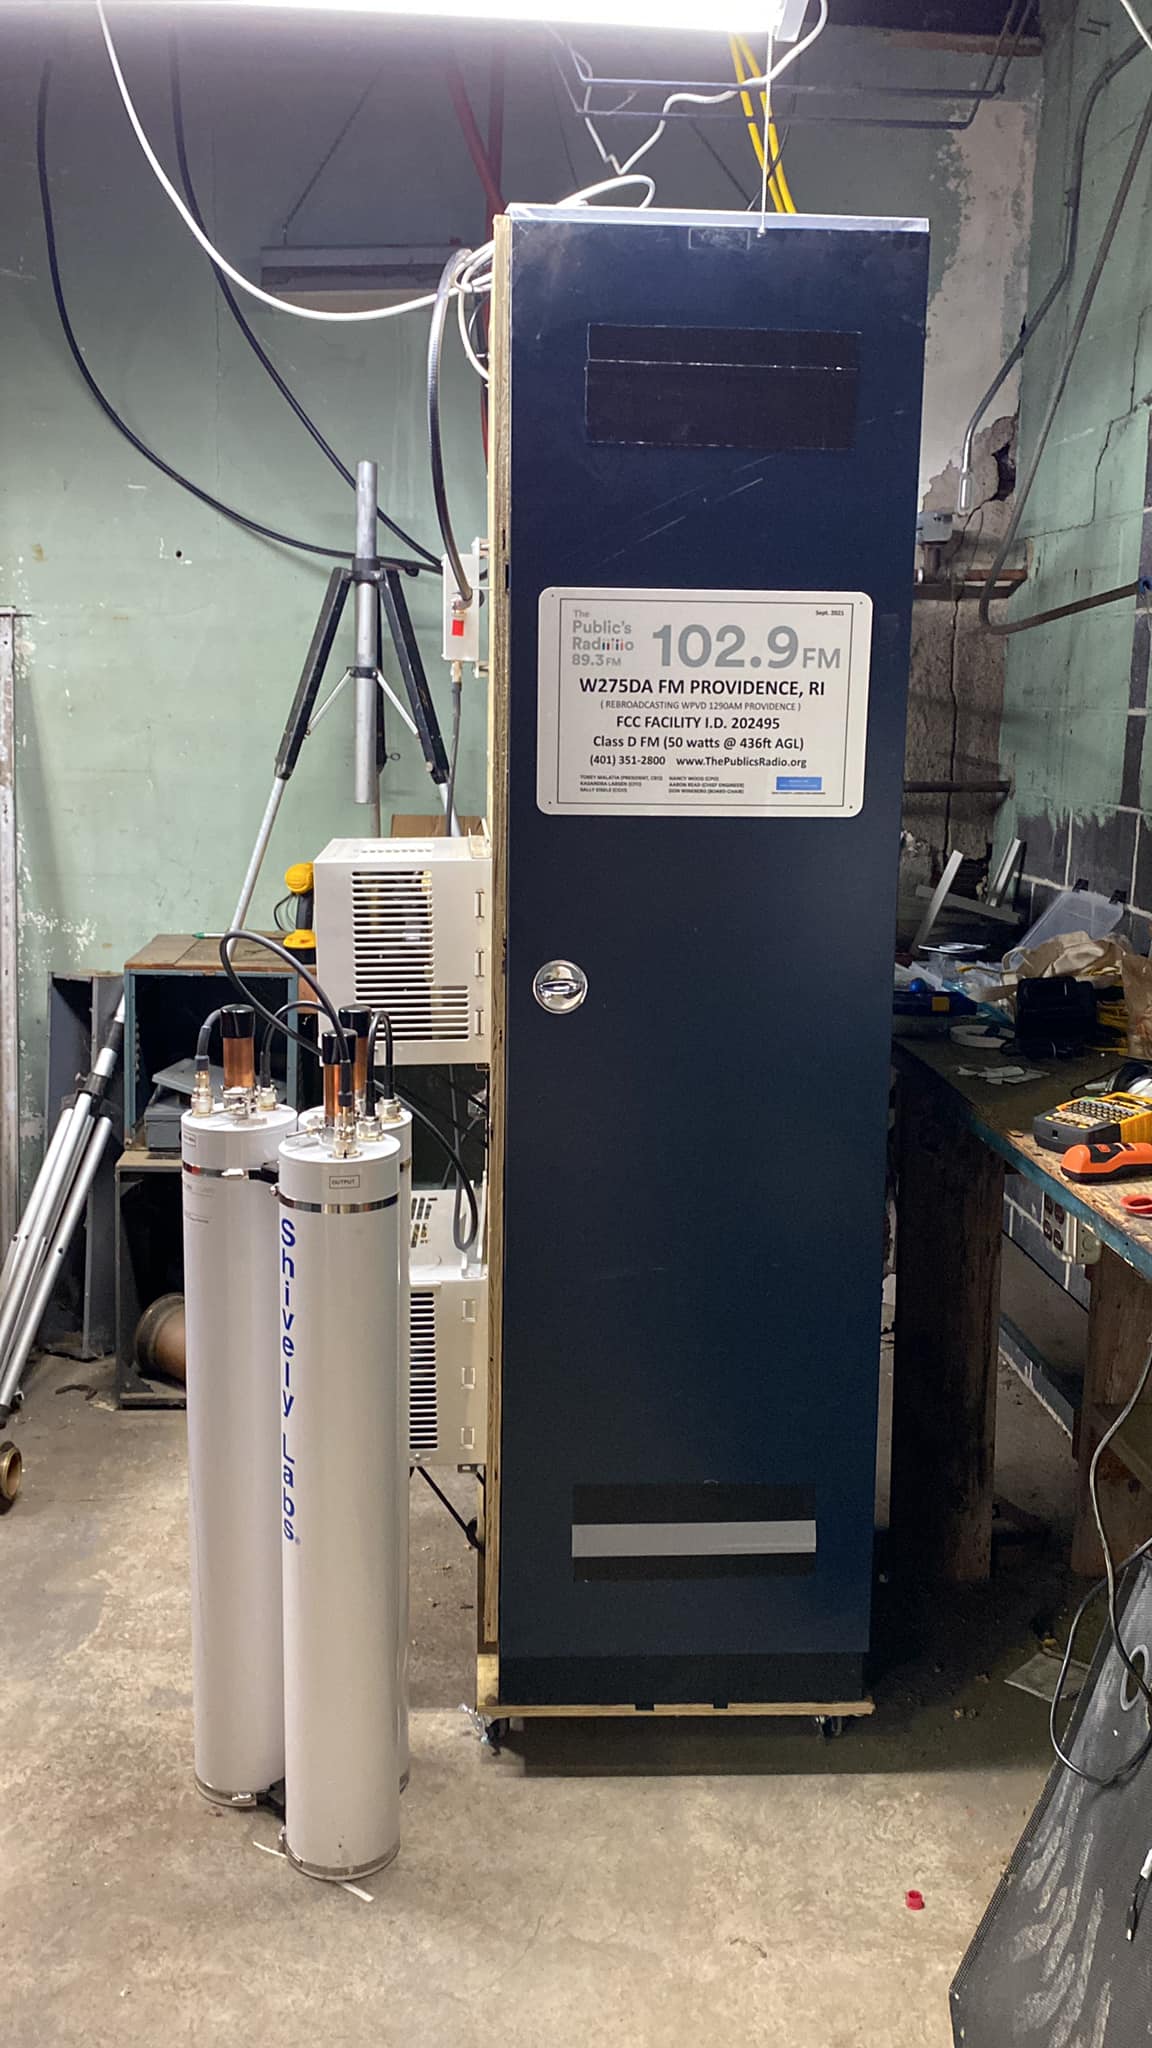
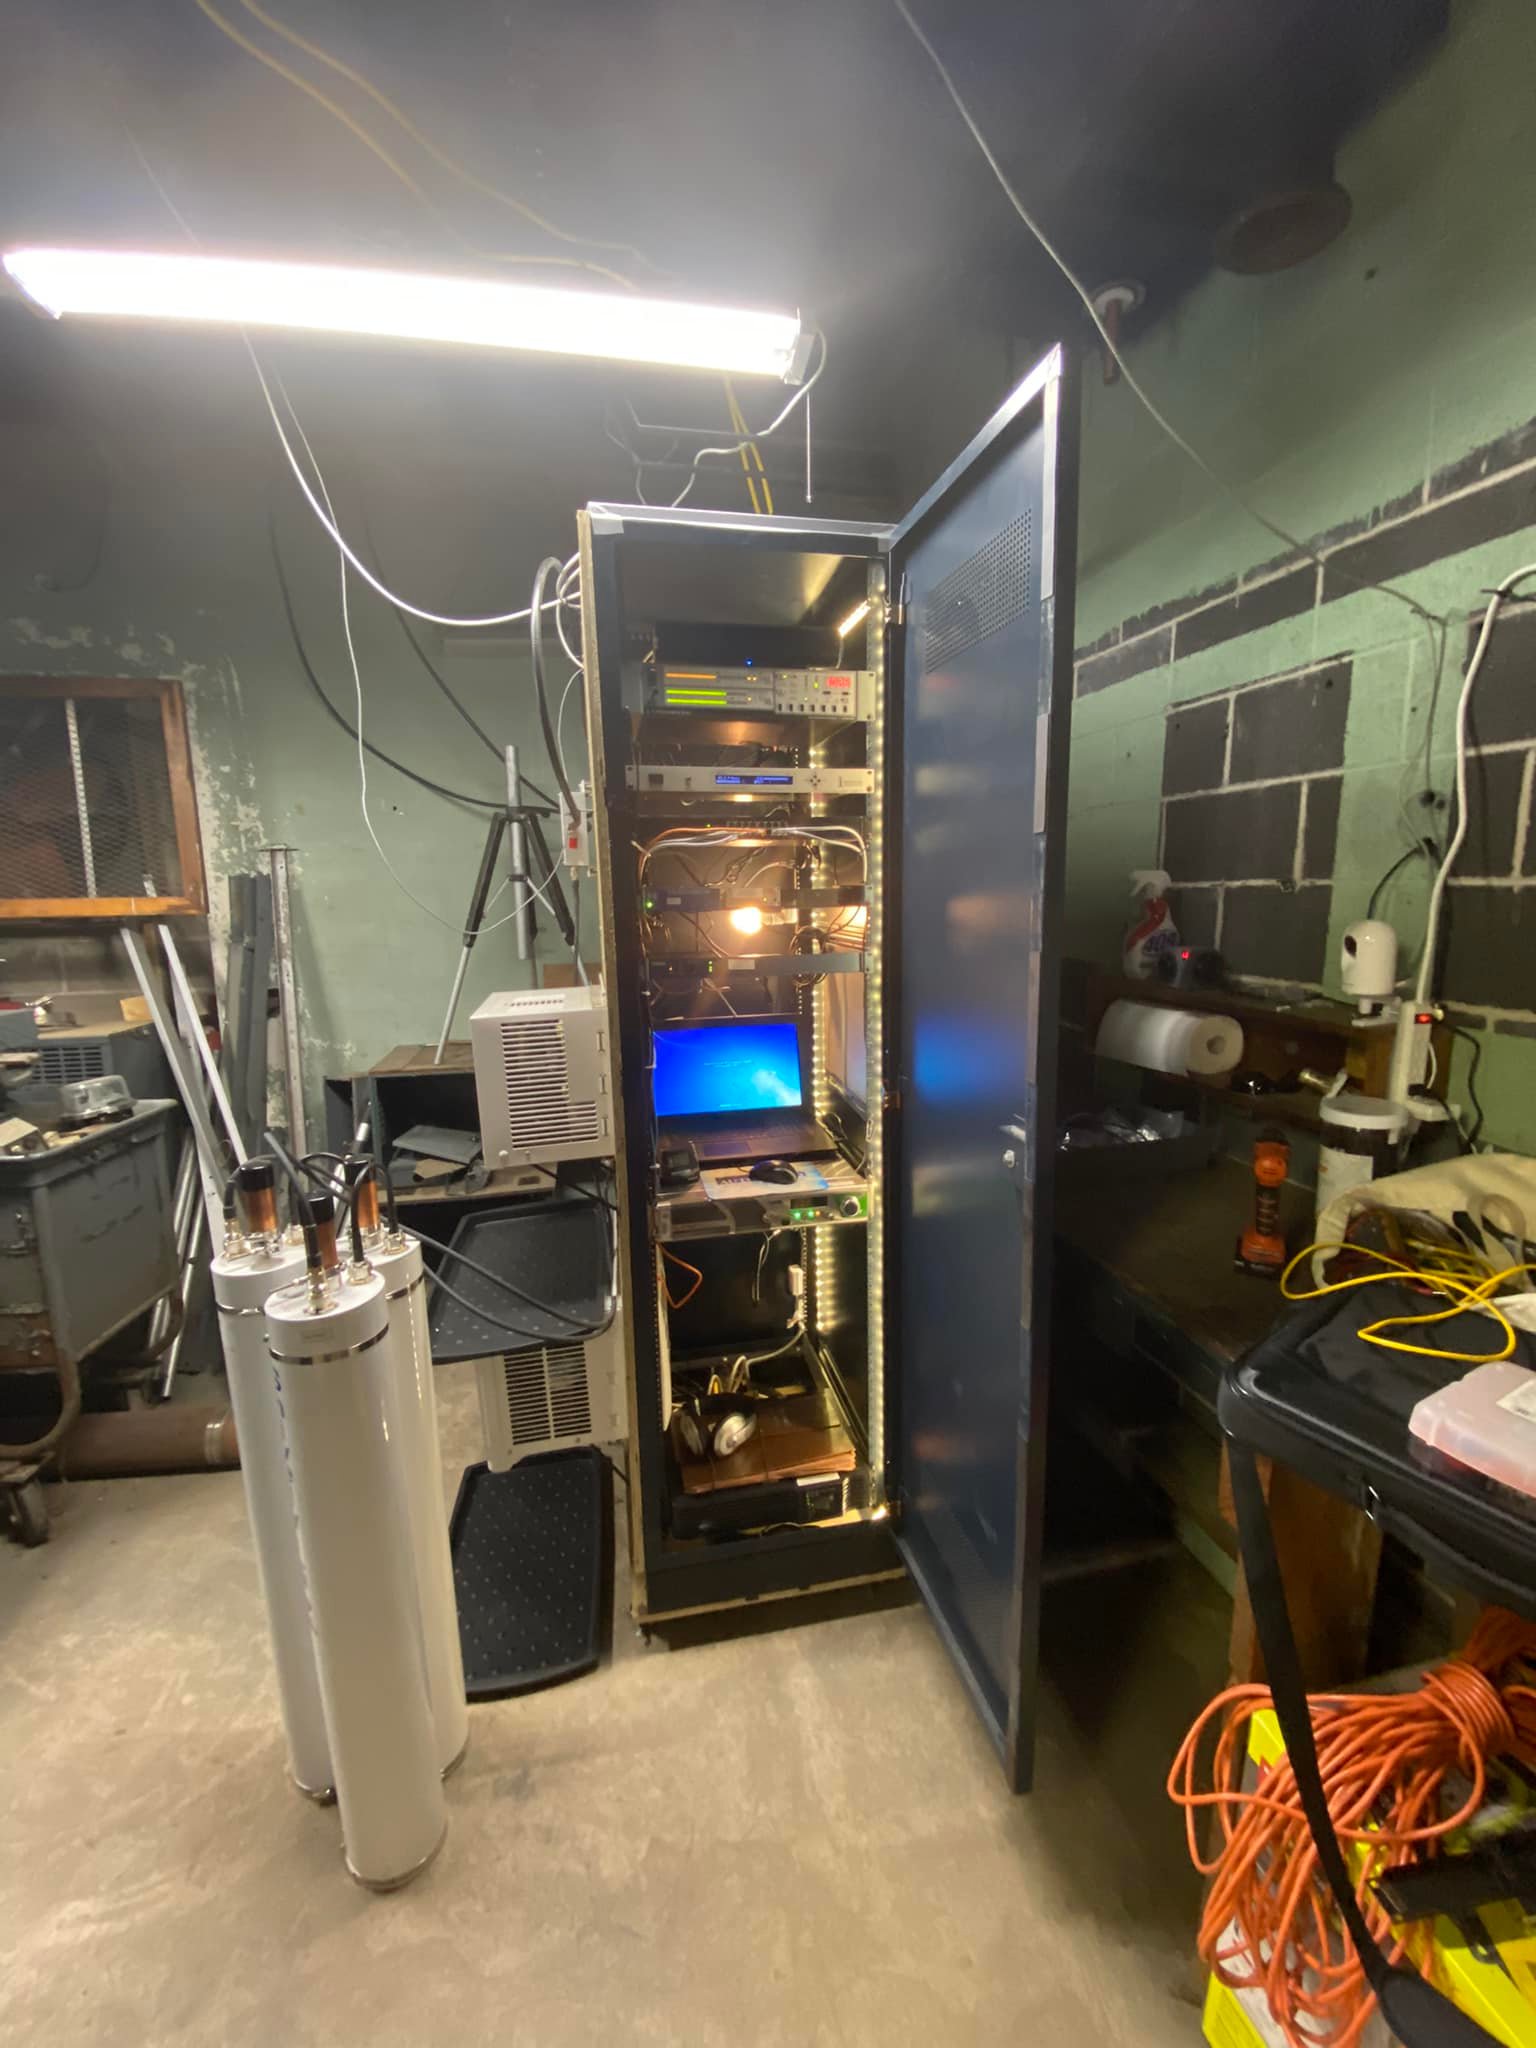
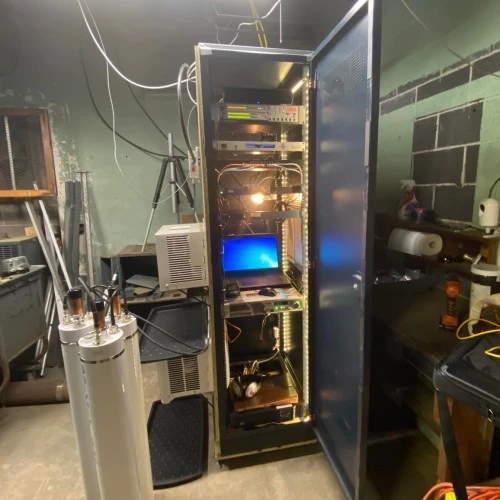
If I couldn’t build a proper room, the least I could do was create a sealed cabinet and hang an air conditioner on it. Your Intrepid Engineer had two window-unit A/C’s collecting dust in his basement (I replaced them with my beloved Midea MAW08V1QWT “micro-split” units) that I could donate to the cause. In spitballing the idea with one of my contract engineers, he mentioned he had a full-height, 30in-deep rack cabinet with a power outlet rail and doors on the front/back that he could (very graciously!) donate from his day job. And thus a plan begun to form:
- Seal up the rack cabinet as much as reasonably possible.
- Remove one side panel, replace with pressure-treated plywood.
- Cut holes in the plywood for the A/C’s. Have two: main and backup for redundancy.
- Window-unit A/C’s meant closed-loop cooling; no dust from outside air anymore.
- Space out the equipment in the oversized rack to ensure easy air circulation.
The window-unit A/C’s will dump a lot of heat into the room, but as mentioned the room is huge and the airflow pretty good. It can handle that heat, no problem. Also, window-unit A/C’s can drip condensate water out the back…right on the concrete floor. In this case, I gambled…correctly…that it wouldn’t be a problem. First, the environment mitigated in favor of less condensate. Second, what little there is usually is intentionally pooled in the back of the A/C for the blower fan to “graze” as it spins and “flick” onto the heat-exchanger vanes. Third, the floor is nasty and dirty concrete anyways, a little water isn’t going to hurt it. And finally: I got a couple of plastic boot trays (for your shoes to let the snow melt off of) to catch any water spillage and let it re-evaporate.
Constructing the Cabinet
First, using 3in wide Flex Seal tape I sealed up the air vent grilles and all but one open passthru (make Billy Mays go away!). I don’t care about the “waterproof” aspect (it’s not, really) but it’s easy to apply, fairly thick for tape, and sticky as hell, so it ought to insulate things reasonably well. Stainless-steel wool balls filled the gaps otherwise (rodents won’t chew it, it’s flexible, and it doesn’t rust…but make sure you get the stainless kind).
Next I adjusted the front and rear vertical rack rails to ensure at least two inches of clearance in the front and rear between any equipment and the doors. This is necessary for good air circulation.
Then some careful measurements and off to Home Depot to pick up some 3/4in ground-contact-rated pressure-treated plywood sheeting. One sheet for the side panel, one for the bottom. The bottom closes up the opening there, but it also allows easy mounting of 2.5in caster wheels (two of which are “locking”) and that makes the whole shebang conveniently mobile. Both wood panels are extensively bolted and wood-screwed to the metal of the rack. I had to go overboard here because I needed a good seal and because both would had a fair amount of torque force placed on them.
More careful measurements to outline the areas where it was safe to cut square holes for the A/C’s, and then the A/C’s themselves. I wanted to leave a little extra room in case future A/C units were bigger than the current two that I had. Then a jigsaw to cut the holes and some extensive cleanup of sawdust afterwards.
Each A/C has two L-brackets to support the weight and keep the A/C tilted “down and out” by 1 or 2 degrees, to ensure any condensate water drips outside the cabinet, not into it. Also because normally a window unit A/C sticks fairly far in on the interior side of a window. I can’t have that here, or it’d block equipment from being mounted in the rack rails! So they’re only barely sitting in the hole-slots; the bulk of the weight is on the L-brackets.
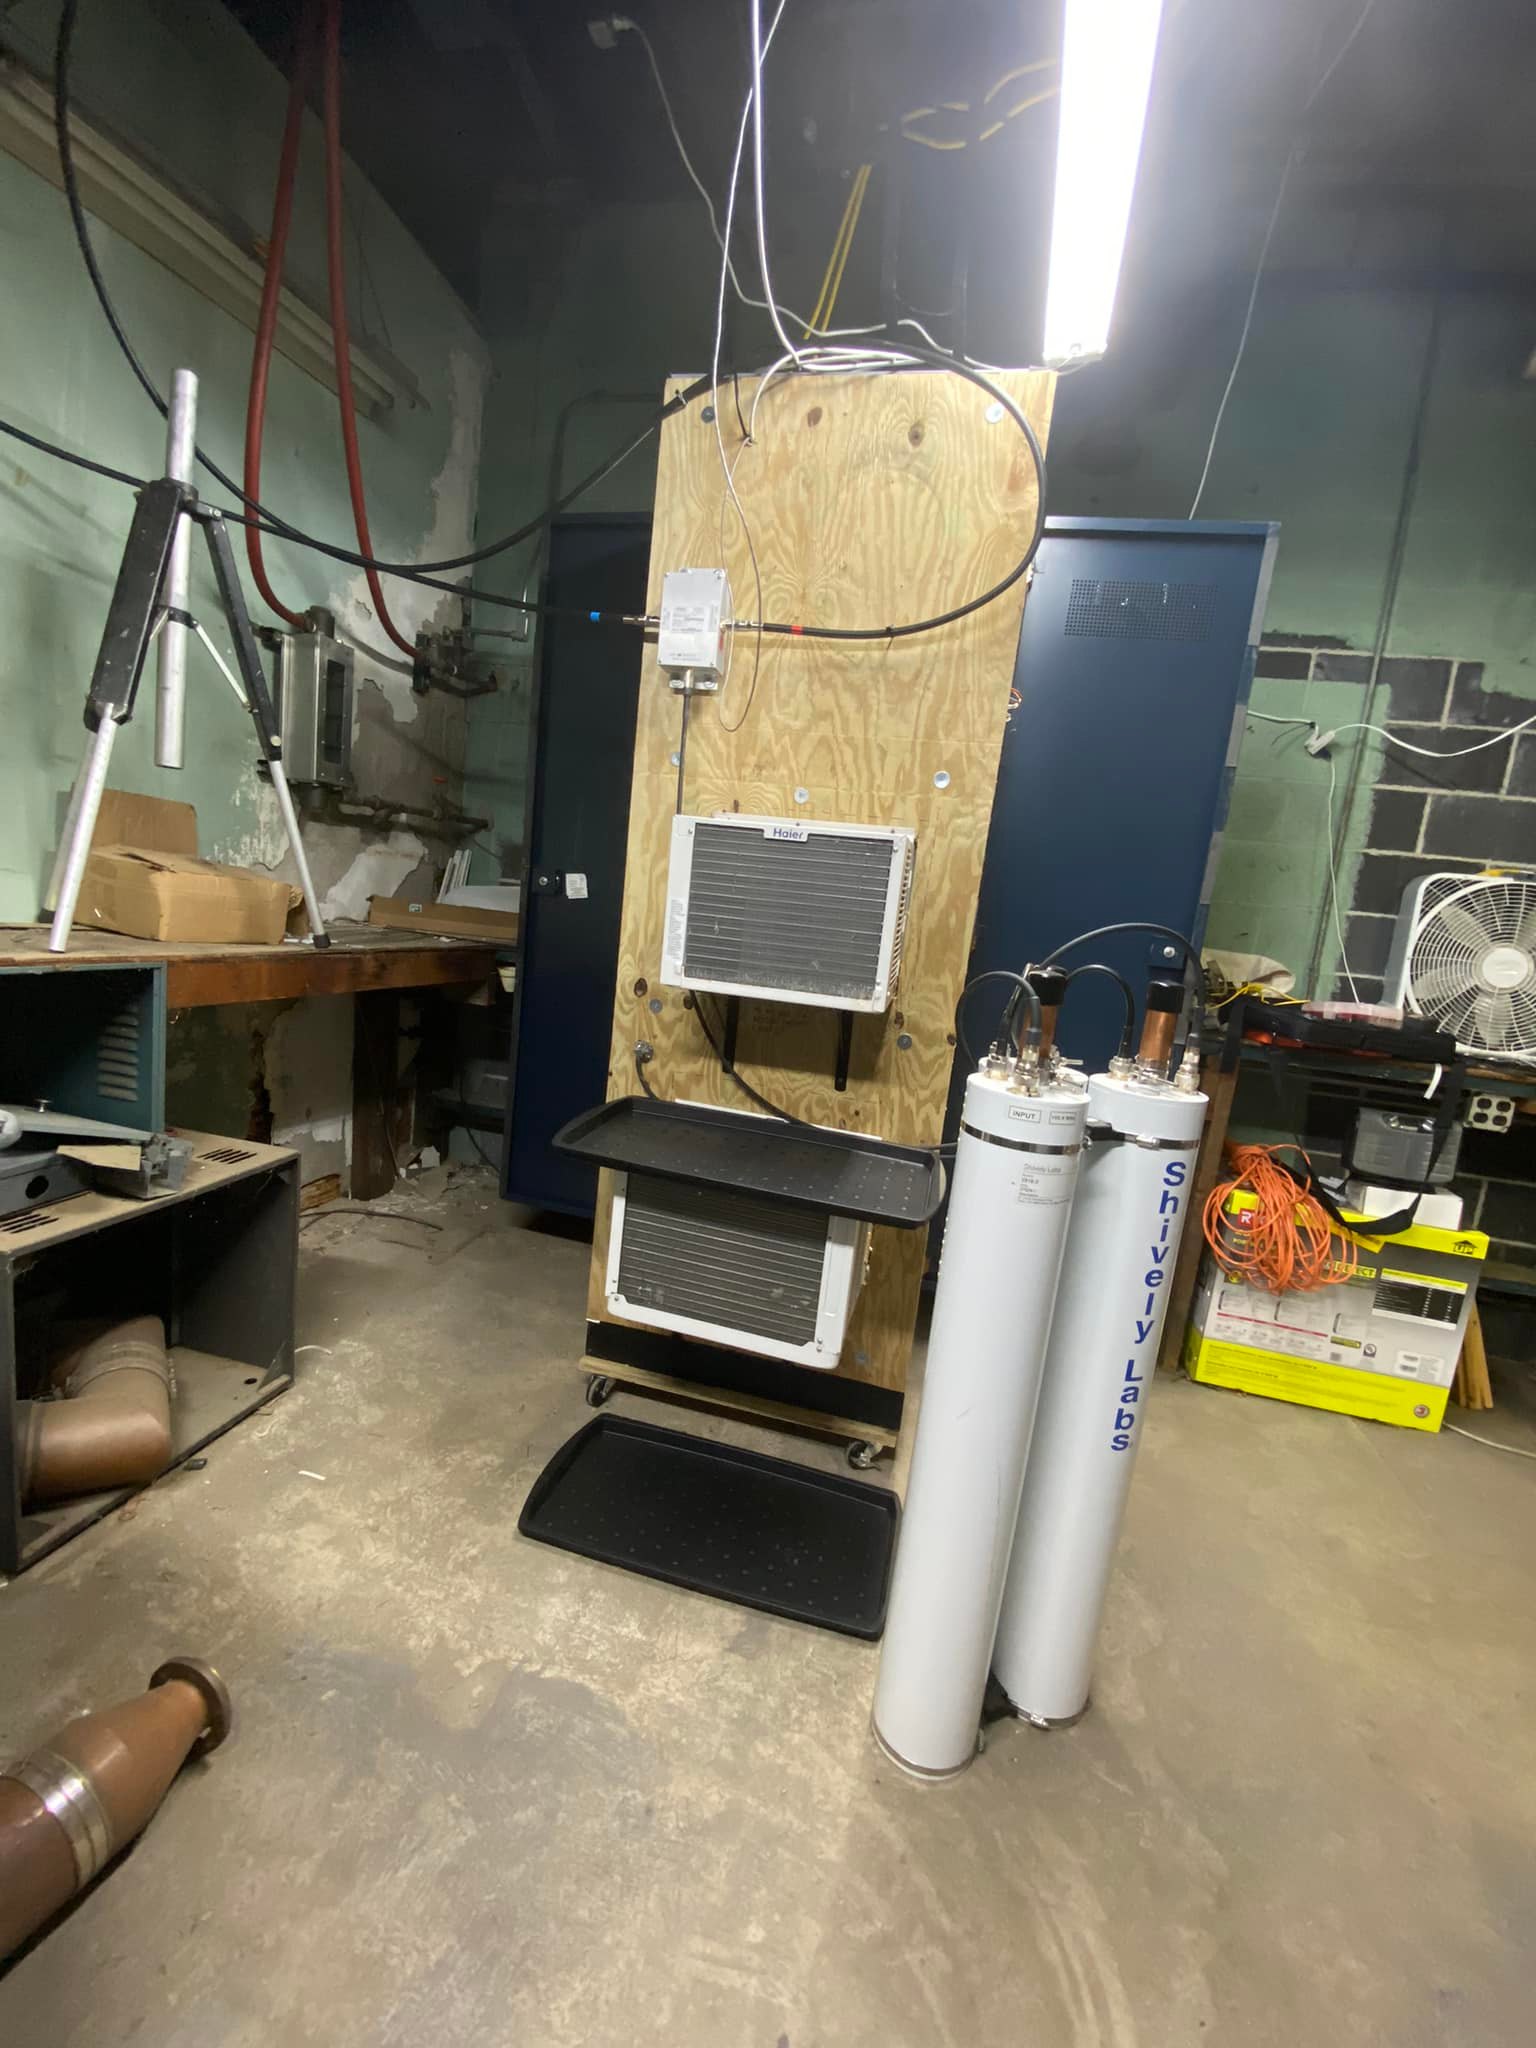
Note that I put the A/C’s a mid-height and low-height on the cabinet. Warm air rises, cool air descends, so technically I should’ve put one at mid-height and one at high-height, right? I decided not to, because I could feel the rack getting “tippy” to the side from the unbalanced weight, and I didn’t want to rely on some kind of external bracing. Putting the A/C’s lower = lower center of gravity = more stable. So far the air circulation seems sufficient that this isn’t a problem.
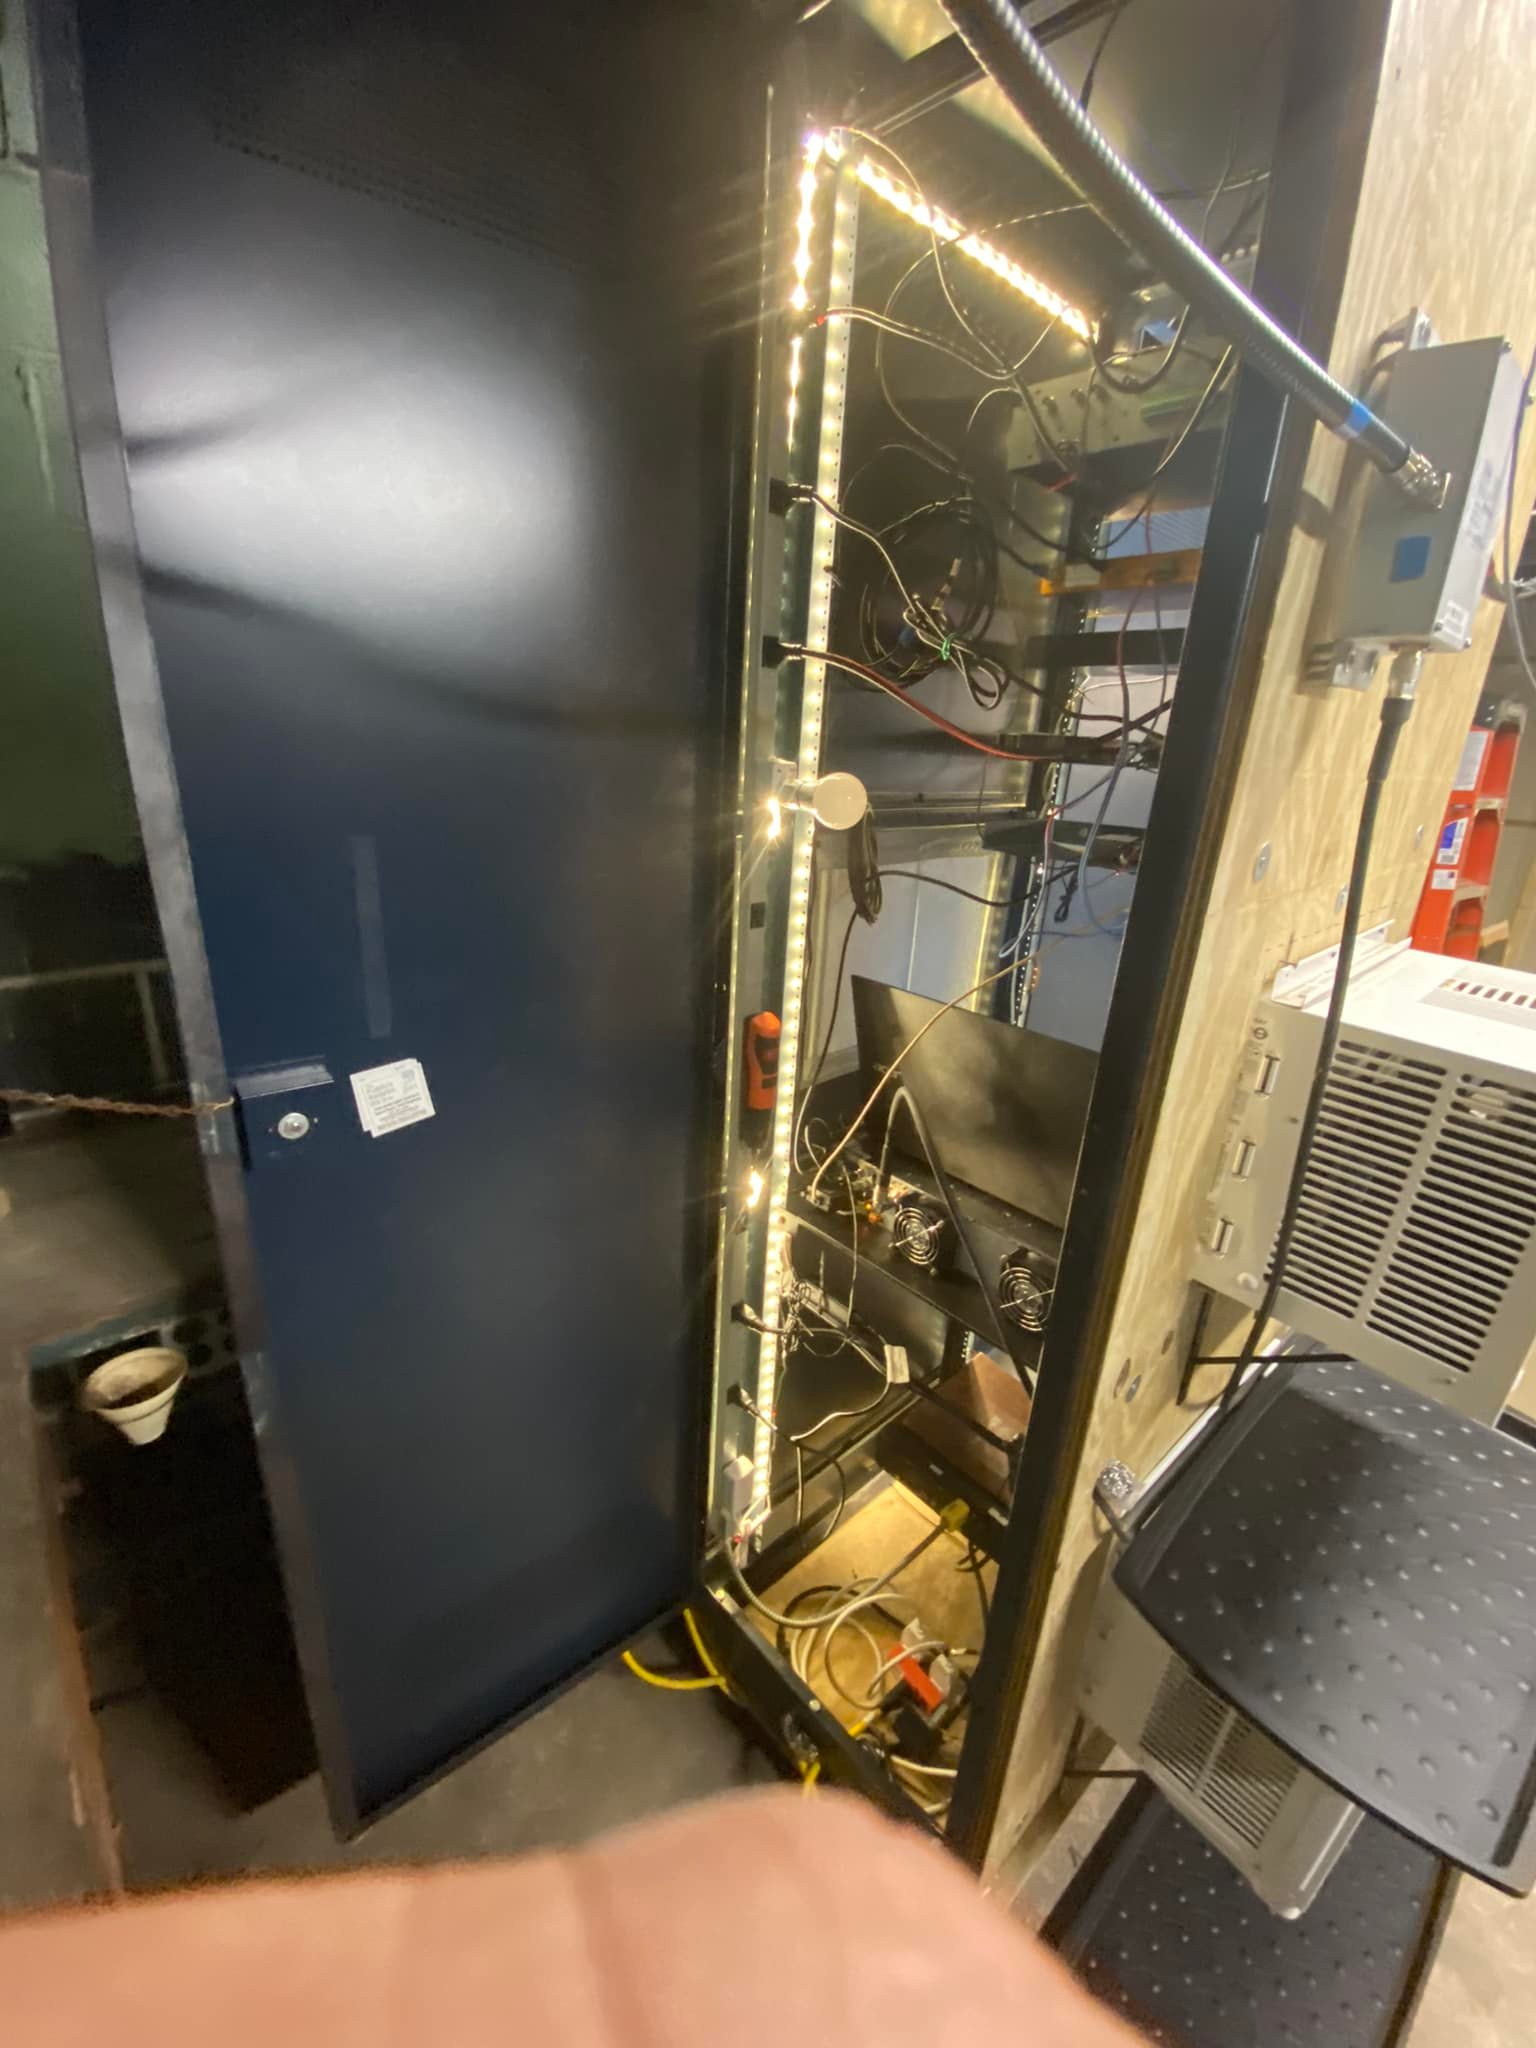
I bought some sticky-backed LED strip lighting and ran it up the back and back down the front to assist in illuminating inside the cabinet. You can get all kinds of styles and make it a party, but I went with the basic 16ft long white-light from Home Depot on-sale for $18.
Long strips of magnetic tape along the edges of the rack doors make for a weak but serviceable seal. The doors don’t latch, so the magnets are all that hold them closed, but it’s enough.
I ran two beefy 25ft extension cords from our existing outlets up to the ceiling, then back down to the rack (for better mobility). One cord goes to the Tripp Lite UPS/battery backup that powers everything in the rack…including the transmitter…for about 30-40 minutes if the power goes out. (in theory, the generator will fire up in less than one minute) The other cord is just for the air conditioners. The spreads the amperage load around a bit. It does, however, also mean that we could trip a breaker on the A/C’s and not the rest of the rack. That means someone has to physically get up there fairly quickly (within a couple hours) to either reset the breaker or open the cabinet doors for cooling. Fortunately, the Elenos ETG150 transmitter puts out surprisingly little heat, and everything else in there has a negligible heat load.
I put a thermometer/hydrometer inside, closed it all up, and let the A/C run for an hour while I got lunch. After coming back, I found it to be 85F in the room but 75F inside the cabinet. The relative humidity was also 75%…higher than I’d like, but manageable…and there wasn’t any obvious condensation anywhere inside.
Looks like we’re ready!
Time to Move It All
After switching 102.9 to broadcast from the aux site located on the 1290AM tower in North Providence, I shut everything down and started moving all the equipment over.
- Elenos ETG150 FM transmitter. (after a good vacuuming of a very dusty air intake)
- Inovonics 531 modulation monitor tuned to 102.9FM.
- Spare speaker hooked up to the 531.
- Inovonics 631 FM receiver for RX of 89.3FM
- 16-port GigE unmanaged ethernet switch.
- Barix Exstreamer & Henry Engineering TwinMatch for backup STL.
- Broadcast Tools Site Sentinel 4 remote control.
- TP Link TL-R600VPN gateway for local networking via a Cox Cablemodem.
- Wifi router for engineer’s convenience whilst on-site.
- Tripp Lite SU1000RTXL2UA 1000VA SmartOnline UPS (double-conversion)
The 531 mod monitor is mostly there just to be a radio receiver for the speaker for “monitoring/listening” purposes, but it’s good to confirm what’s coming out of 102.9 is what it should be. It also has the ability to close a relay on silence detection so that’s handy.
The 631 is an older Inovonics unit but it’s perfect here. I have great signal levels of 89.3FM thanks to a SAMCO SAM159 eight-element yagi antenna on the roof. So it picks up 89.3 and spits it out as a composite signal feed that goes right into the Elenos transmitter. This preserves the audio processing, RDS messaging, and SCA radio reading service on 89.3 also are on 102.9 as well. Quick note: technically W275DA relays WPVD 1290AM. But since WPVD and WNPN 89.3 are a simulcast, it’s legal to rebroadcast 89.3 directly as we’re doing here.
BTW can I just say how much I love Inovonics gear? Great stuff, tailored to broadcasters’ needs, excellent pre- and post-sale service…and based in the USA, too!
There is a Barix Exstreamer webcast player that’s hooked up to the Elenos via a Henry Engineering TwinMatch balancing amp. It’s very clunky but it’s possible to switch the Elenos to broadcast that instead of 89.3; just in case 89.3 goes away but 102.9 is still present. This is one of those things I really wish Elenos did better. Their transmitters are nigh-bulletproof and reasonably priced, but their documentation is nonexistent, their SNMP implementation is a completely non-standard sick joke, and their overall web GUI and control/telemetry systems are a dog’s breakfast. C’est la vie. We needed a transmitter, and Elenos was the only one who had one in-stock (durned supply chain issues!) and so far we’ve made it work for our needs.
Rounding things out, we have a basic but proven commodity in the TL-R600VPN gateway, coupled to a Cox Cablemodem (now mounted inside the cabinet). There’s an unmanaged (“dumb”) GigE ethernet switch, and a Broadcast Tools Site Sentinel 4 remote control. Normally we use Burk R/C’s but I had the Site Sentinel 4 handy; they’re ideal for simple facilities like this. Inexpensive, yet surprisingly capable.
It took about two hours to disconnect everything, remove it from the old rack, move it to the new rack, and re-run all the wiring inside the rack. Then another hour to re-position the stiff heliax RF cable and re-mount the Scala RF divider that splits the transmitter output to go to the two different antenna arrays on the tower.
Afterwards I fired it all back up. At first there was wildly-too-high reflected power, but a quick check of the cables revealed one of them on the divider was loose. Re-tightening it solved the problem, and we were back on the air with 110w forward, and 0w reflected, power on the transmitter.
The Finishing Touches
Now I had time to finish things up more neatly, tidying up the cables & zip-tying things in place. I also grabbed an old leftover laptop that I’m setting up to be a “house computer” for use while on-site in the future.
I also picked up some hanging bags of “DampRid” to help bring the humidity down somewhat. We’ll see how that works.
Finally, I ordered a humidity sensor to wire into the remote control for alarm & logging purposes. A more informative ThermPro TP63B thermometer/hygrometer will go on the outside of the rack, in view of the security webcam there; allowing quicker checks of the temperature and relative humidity inside the rack cabinet AND in the surrounding room.
And I’m going to wire up a terminal-strip breakout panel to go from the phoenix connectors on the Site Sentinel. Technically phoenix connectors are the easy solution but the tiny form factor of the Site Sentinel means it’s a real pain in the neck to get the connectors out to make any changes. And since you have to pull the whole connector out to work on anything, you have to wipe out all monitoring of, say, all the meters, or all the status inputs, just to change one of them.
I’m also debating adding some R4 solid foam insulation to the inside of the rack. It would help better isolate the rack from the outside heat, true. But I already have more cooling than I need; reducing the heat load even further could just result in too-quick cycling of the air conditioner and that’s a recipe for damaging levels of humidity. Also if both A/C’s fail (e.g. a power outage) then for much of the year, that insulation will work against me: trapping the transmitter’s waste heat and reducing the time an engineer has to physically get on-site to open the cabinet’s doors.
One Last Thing…
Speaking of which, I vaguely expect that once the outside weather gets consistently cool (highs in the mid-60’s) I’ll turn off the A/C’s and leave the doors open. This is less ideal from an air filtration standpoint, but window-unit A/C’s can and will “ice up” if the ambient air temps are lower than the mid-50’s, give or take. And an iced-up A/C simply won’t work until the ice around the compressor melts, which could take hours.
So there you have it! I’ve rarely been so proud of what is, technically, an ugly hack. To do it “right” probably would cost over $15,000 in drywall and HVAC contractors. My project cost less than $500. Boo-yah! 🙂
Update! (Sept 2022)
Turns out even a measly 5000 BTU air conditioner is noticeably too much cooling capacity for such a small area and tiny heat load. When you’ve got too much cooling, the a/c cycles on and off too quickly. Besides stressing the compressor motor quite a lot, more importantly it doesn’t run long enough to remove any humidity from the air. So I was getting wildly huge relative humidity swings. If it weren’t for bags and bags of DampRid, I’m pretty sure I’d be seeing condensation forming on the walls. That’s BAD.
I tried some experiments with thermoelectric cooling and it didn’t really work; not enough cooling and too little airflow. There was water dripping off the heatsink (or coldsink?) fins. Eventually I found the Tripp Lite SRCOOL2KWM which is kinda-sorta meant for situations like this. It’s the only 2000 BTU air conditioner I could find. It is also very noisy and, as expected, it doesn’t cool nearly as fast. But that’s what I want! Now the rack is consistently staying about 75F and the humidity levels, while variable, aren’t swinging wildly up and down.
I also used a combination of 1/4in PVC sheets and plastic bubblewrap mailer to guide the cool air outflow down one side of the Elenos transmitter (more than anything else, it “divides” the top from the bottom of the cabinet) and the another strip of plywood with a quartet of 4in 12VDC muffin fans blowing air back up the other side. This circulates the air better and it also gets air back up to the Tripp Lite A/C’s intake.
The original 5000 BTU leftover A/C I had is now at the bottom hole, serving as the backup. It’s set so things have to get up around 90F before it turns on, but it’ll keep things from melting down if the Tripp Lite fails.
And that’s a risk; some of the reviews of the Tripp Lite were not positive; sudden failure after 6 to 8 months was mentioned. I think if that happens, my next step is to pick up a Midea “U” MAW08V1QWT air conditioner. While their 8000 BTU rating is much more cooling than I need, they use an inverter-based compressor which (besides being quiet) can ramp up and down far more efficiently to match the heat load in a given space. Plus they can be set to automatically “cool” or simply “dry” a space.
Leave a comment